Microsoft Word will automatically move content to the next page when the current page is full.
But you might occasionally find that you would like to advance the page yourself.
This is best accomplished with a page break, which is one of the options that you can use to affect the layout of a document.
If you discover that you no longer need a page break that you added, then our how to remove page breaks in Microsoft Word guide below will show you how to get rid of them.
How to Delete a Page Break in Microsoft Word
- Open the document.
- Select Home.
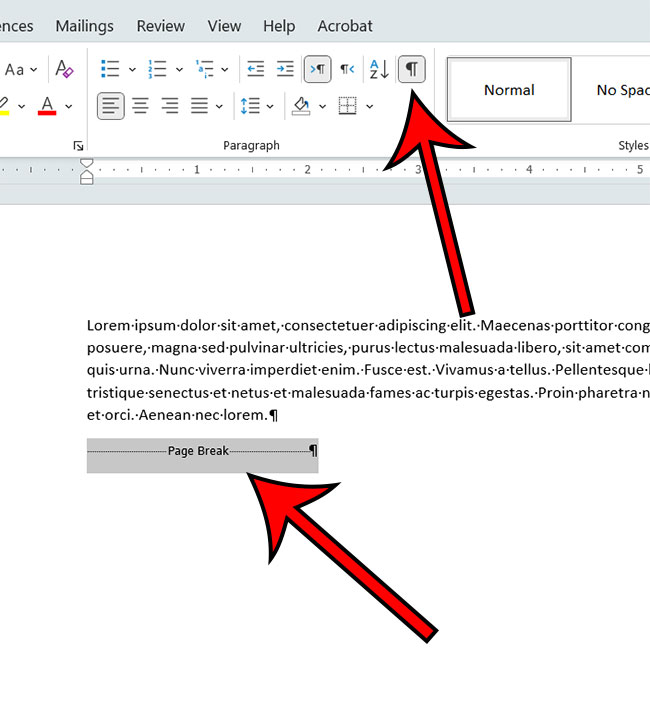
- Click the Show/Hide button.
- Double-click on the page break.
- Press Backspace to delete it.
Our guide continues below with additional information on how to remove page breaks in Microsoft Word for Office 365.
Page breaks are the means through which a document created in Microsoft Word is segmented into many pages.
On the other hand, these page breaks can occasionally cause formatting errors or interfere with the natural flow of the material.
In this piece, we will go over how you can eliminate page breaks in Microsoft Word.
Learning how to remove page breaks from a document can assist in enhancing the document’s overall appearance as well as its readability, and this is true whether you are working on a personal letter or a professional report.
Related: You can read our how to add page numbers in Microsoft Word guide if you would like ot include them in a document that you’re editing.
How to Get Rid of Microsoft Word for Office 365 Page Breaks
The steps in this article were performed in the Microsoft Word for Office 365 version of the application.
Step 1: Open your Microsoft Word document.
Step 2: Select the Home tab at the top of the window.
Step 3: Click the Show/Hide button in the Paragraph group in the ribbon.
Step 4: Find the page break that you want to remove, then double-click it to select it.
Step 5: Press the Delete or Backspace key on your keyboard to finish the removal of the page break.
Now that you know how to remove page breaks in Microsoft Word you will be able to fix issues that might have come up with breaks that you or someone else has added to one of the documents that you are working with.
More Information About Microsoft Word Page Breaks
Note that this document will only help you to remove manually-inserted page breaks, such as the ones that you would add by going to the Layout > Breaks menu.
If there is a naturally occurring page break at a point in your document, then this won’t work to remove that.
In Microsoft Word, page breaks are used to divide a document into different pages. They can be useful in regulating the layout and formatting of a page, but they can also cause problems if not properly positioned.
Below we will summarize how to remove page breaks in Word using the “Find and Replace” feature, manually erasing the breaks, and altering the document layout.
Using the “Find and Replace” feature in Word is one of the simplest ways to remove page breaks.
To do this, you can go to the “Home” tab and select “Replace” from the “Editing” group. Enter “^m” (without the quotations) in the “Find What” area and leave the “Replace With” field blank.
This instructs Word to search for all manual page breaks and replace them with nothing. When you select “Replace All,” all of the page breaks in your document will be eliminated.
Another option for deleting page breaks in Word is to delete them manually.
Simply move your mouse over the page break and press the “Delete” key on your keyboard. You can easily erase a page break by pressing the “Backspace” key.
However, if your text contains a lot of page breaks, this method can be time-consuming.
In Word, adjusting the document layout can also help remove page breaks.
Navigate to the “Page Layout” tab and select “Breaks” from the “Page Setup” group.
To modify how the document is broken into pages, select “Next Page” or “Continuous” from the drop-down menu.
When you choose “Next Page,” each portion of your work will begin on a new page.
If you choose “Continuous,” the document will flow from one page to the next flawlessly. This can reduce the requirement for page breaks.
In addition to these approaches, you can manage the location of page breaks by using the “Keep with Next” and “Keep Lines Together” options.
These choices can be found on the “Home” tab in the “Paragraph” group. “Keep with Following” will keep the current paragraph and the next one together so that they are not split by a page break.
“Keep Lines Together” will keep all lines in the current paragraph together, preventing page breaks.
Finally, while page breaks in Microsoft Word can be useful for controlling the style and formatting of a document, they can also cause problems if they are not positioned correctly.
You may simply remove page breaks and improve the overall look and readability of your document by using the “Find and Replace” feature, manually eliminating the breaks, altering the document layout, and using the “Keep with Next” and “Keep Lines Together” options.
Matthew Young has been writing tutorials about Microsoft Word and other Office applications for many years. His writing can be found on dozens of websites.