While you may be used to modifying the formatting of your Word documents to match the needs of your school or employment, you may find yourself in a scenario where you need to utilize other settings.
Microsoft Word has a plethora of tools and menus that allow you to personalize your document, and line spacing is one of them.
Even if you have previously written and changed the entire document, our tutorial below will show you how to single space in Word.
Follow these simple steps to single-space a manuscript in Microsoft Word:
- Launch Microsoft Word and open your document.
- Select the text you wish to single-space.
- Go to the top of the screen and select the ‘Home’ tab.
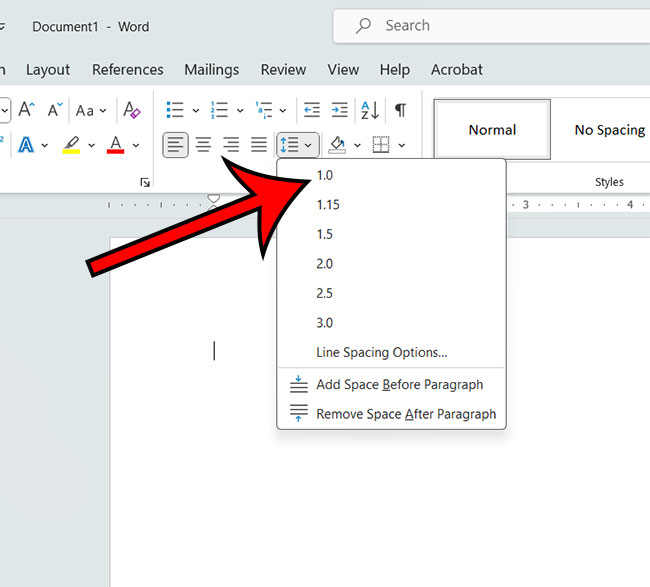
- Locate and click the ‘Line and Paragraph Spacing’ button.
- Choose the ‘1.0’ option from the dropdown menu.
The highlighted text will be converted into single-spaced formatting, giving your work a neater and more compact appearance.
Our explanation continues below with more information, including screenshots, on how to make a document single space instead of double space in Microsoft Word.
The number of pages in a document, for example, can be affected by document spacing. Microsoft Word has numerous distinct choices for controlling the amount of space between lines in your page.
When it comes to the amount of line spacing in your documents, many institutions and organizations have their own regulations and preferences. They frequently request double spacing, yet it is completely likely that they would prefer single spacing to limit the amount of pages in publications.
A document in Microsoft Word can be formatted in a variety of ways, including the amount of space between lines.
You may be looking for a solution to alter your current document if it is double spaced or looks to have more or less spacing than the single spacing you require.
You may create a single space document in Microsoft Word by opening the document, selecting all of the text, going to the Home tab, clicking the Line and Paragraph Spacing button, and then picking the 1.0 option from the drop down box.
Our instructions below will show you how to single space in Word by selecting all of the text and altering the line spacing setting.
If you want to learn more about using that option, you can also read our guide on how to select all in Word.
How to Use Word for Office 365 Single Spacing
The procedures in this post were completed in the Microsoft Word for Office 365 edition of the application, but they will also work in the majority of other versions.
Step 1: Launch Microsoft Word and open your document.
Step 2: Select everything by clicking inside the document and then pressing Ctrl + A on your computer.
You can skip this step if this is a new, blank document.
Step 3: At the top of the window, click the Home tab.
Step 4: In the Paragraph area of the ribbon, click the Line & Paragraph Spacing button.
Step 5: From the dropdown menu, select 1.0 to convert the document to single spacing.
You will be able to utilize this parameter to modify the spacing for new or existing documents now that you know how to single space in Word for Office 365.
At the bottom of the dropdown menu, there is a Line Spacing Options button.
If you choose that option, you will be able to further adjust your document spacing and, if desired, create a new default spacing option.
Our lesson continues below with more information on how to make a Word document single spaced.
For more information on Microsoft Word line spacing, see our article on how to double space in Word.
How to Change Microsoft Word’s Default Line Spacing
While you can change line spacing in every Microsoft Word document you create or edit, you may not want to do so every time.
However, if your Word Normal template defaults to double spacing and you need single spacing more frequently, repeatedly altering the line spaces might be not only laborious, but also something you forget to do.
Fortunately, among all of the formatting options available for your document, there is a means to set the default line spacing.
- Start Microsoft Word.
- Go to the Home tab.
- Select Line and Paragraph Spacing from the menu.
- Select the Line Spacing Options.
- Select Line spacing from the drop down menu.
- Choose your preferred line spacing.
- Select Set as Default from the drop-down menu.
- Select All documents based on the Standard template.
- Press the OK button.
Any new documents you produce in Microsoft Word using the Normal template will now have the line spacing you specified.
This will have no effect on any of your previous papers’ line spacing.
More Details on Using Single Line Spacing in Word
While we have concentrated on adjusting the line spacing setting in MS Word, you can also structure a document so that only a portion of it is single spaced.
Rather than choosing the entire document, use your mouse to pick the section of the document where you want to modify the spacing, then repeat the steps above to apply the new line spacing value to that selection.
The paragraph space option is another thing you may change in relation to line spacing. This determines how much line space appears before and after your paragraphs.
Click the Home tab, then the little Paragraph Settings button in the bottom-right corner of the Paragraph group in the ribbon, to access the paragraph spacing settings. The Paragraph dialog box will be displayed.
In the “Spacing” section, you can select line spacing choices to define the amount of space before and after a paragraph as well as the type of line spacing.
Frequently Asked Questions About Making a Word Document Single Spaced
In Word, how can I access the paragraph spacing menu?
While this text has concentrated on changing document spacing using the Line and Paragraph Spacing drop down menu, you may want to edit some other spacing variables as well.
If you choose the Home tab and then click the Paragraph Spacing button at the bottom-right of the Paragraph group, a Paragraph dialog box will appear.
Indents and Spacing, as well as Line and Page Breaks, are available at the top of the Paragraph dialog box.
You can change the spacing between paragraphs and choose other line spacing options here.
What is the significance of the Set as Default button at the bottom of the Paragraph dialog box?
If you make a lot of changes in this dialog box and want them to be applied to new documents you create in the future, you may make these settings the default for future papers.
Simply select the Set as Default button at the bottom of the Paragraph menu, then confirm your decision.
Is it possible to have single spaced text in only a portion of my Microsoft Word document?
Yes, several styles of spacing can coexist in a same page.
Simply repeat the steps above, but instead of choosing the full document, choose only the section you wish to single space.
Then, in the Paragraph group, click the Line and Paragraph Spacing button and select 1.0 to change only the section of the page that is presently highlighted.
How to Create a Word Single Space Document
- Launch the document.
- Select everything by clicking inside the document and pressing Ctrl + A.
- At the top of the window, click the Home tab.
- Select Line and Paragraph Spacing from the menu.
- Select the 1.0 option.
Matthew Young has been writing tutorials about Microsoft Word and other Office applications for many years. His writing can be found on dozens of websites.