Blank pages in Microsoft Word for Office 365 can occur due to accidental page breaks, excessive spaces, or hidden table rows. To delete, switch to ‘Draft’ mode to see page breaks, hit ‘Backspace’ to remove spaces, or address any ending tables. Ensure professional and clean documents every time.
The Sneaky Blank Page
Ever been typing up a storm in Microsoft Word, only to finish and realize there’s an unwanted blank page staring back at you? You’re not alone. Like that last cookie nobody wants to eat, blank pages can often feel like they’re there just to annoy us. But fear not! There’s a simple solution. Let’s dive in.
Understanding the Culprit
Before we tackle the issue, it’s essential to understand why these blank pages appear in the first place.
- Accidental Page Breaks: Sometimes, we might accidentally hit the “Page Break” button. Oops!
- Too Many Spaces: If you’ve hit the ‘Enter’ key one too many times, you could end up with an extra page.
- Hidden Table Rows: Believe it or not, sometimes a table can be the sneaky culprit. If a document ends with a table, Word might insert a blank page after it.
Related: Mastering the Basics of Microsoft Word
Show That Page Who’s Boss!
Alright, now that we know what might be causing the issue, let’s get to the solutions.
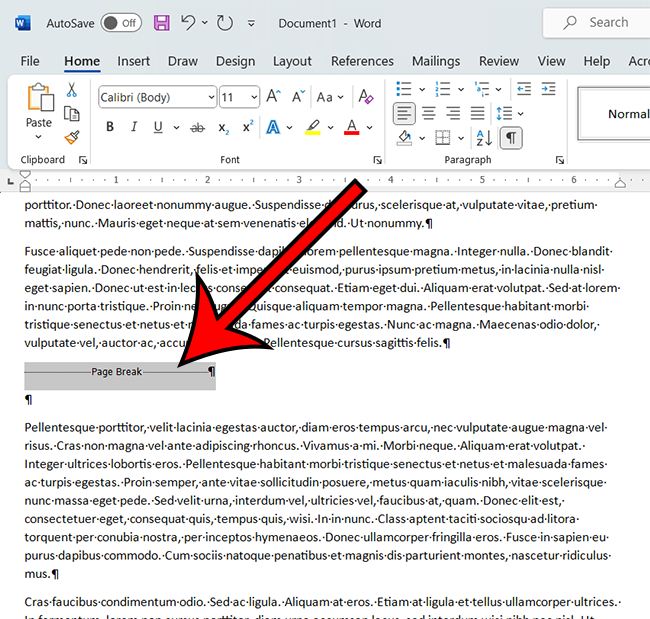
1. Deleting Unwanted Page Breaks
- Go to the ‘View’ tab.
- Click on ‘Draft’ mode.
- Find the dotted line saying ‘Page Break’. Click on it and hit ‘Delete’.
2. Removing Excessive Spaces
- Place your cursor at the beginning of the blank page.
- Press ‘Backspace’ until the page disappears. Simple, right?
3. Handling Hidden Table Rows
- If your document ends with a table, place your cursor at the end.
- Hit ‘Backspace’. This should delete any sneaky blank pages.
Pros of Knowing How to Delete a Blank Page
- Saves Paper: No more printing those pesky empty pages.
- Professional Look: Ensure your documents always look clean and polished.
- Peace of Mind: No more frustration when that blank page just won’t go away.
Cons of Not Dealing with Blank Pages
- Waste of Resources: Imagine the trees you’re saving by not printing that extra page!
- Confusion: Readers might think there’s missing information.
- Unprofessional: Let’s be honest, it doesn’t look great.
Additional Information
While we’ve covered the most common reasons for blank pages, there are other more technical issues that might cause them. These include section breaks or formatting issues. If you find that your blank page isn’t going away, consider reaching out for additional help or diving into more advanced Word settings.
Conclusion
Blank pages in Microsoft Word can be pesky, but with a bit of know-how, they’re easy to tackle. Remember, the key is to understand the root cause and then apply the right solution. Happy typing!
FAQs
- Why do blank pages appear at the end of my document?
- Often due to accidental page breaks, excessive spaces, or hidden table rows.
- Can I prevent blank pages from appearing in the future?
- Yes! Being mindful of extra spaces and understanding page breaks can help.
- Why can’t I see the ‘Page Break’ line in my document?
- Ensure you’re in ‘Draft’ mode. This mode reveals elements like page breaks.
- Do blank pages affect the word count?
- No, blank pages do not add to your word count.
- Can blank pages appear in the middle of my document?
- Absolutely! The same principles apply; find the culprit and delete it.
Matthew Young has been writing tutorials about Microsoft Word and other Office applications for many years. His writing can be found on dozens of websites.